Integrate Liftoff and Safsira for Premium POD with Order Desk

October 19, 2024 05:05 PM
A couple of months ago we introduced Aviators (that's you) to the order management power of Order Desk, followed by a tutorial demonstrating how to use Order Desk to send print-on-demand orders. Since then we've seen Order Desk gain some traction with our distributor friends. Meanwhile, a new automated solution for both 1-piece POD and bulk orders has been pinging our radar.
Safsira is a comprehensive platform that enables businesses to seamlessly integrate swag and promotional products into their offerings. By providing a unified API, Safsira connects users to top suppliers in both print-on-demand and bulk merchandise, including premium brands like North Face, Nike, Stanley, and Sony.

Its advanced software automates artwork preparation, pricing validation, order routing, and the entire decoration and fulfillment process, allowing companies to efficiently offer customized products without significant upfront costs.

Safsira launched with a Shopify app that makes it easy to incorporate it into your Shopify programs. Now, with the recent release of their Order Desk integration, Safsira can be integrated into many more programs whether their shopping cart is Liftoff, Order My Gear, Bright Stores, or any of Order Desk's many integrated platforms.

In this tutorial we're going to cover how to configure products in Liftoff and set up your Safsira Order Desk integration so that, when ordered, are automatically sent to Safsira for production and fulfillment. If you don't use Liftoff, that's okay – the concepts below will apply to most e-commerce platforms. If you're new to Liftoff or Order Desk and get stuck, PromoPilot is happy to lend a hand.
Video Tutorial
If you get stuck or just prefer to see someone go through the steps, a video tutorial is available at our YouTube channel.

Creating Products in Safsira
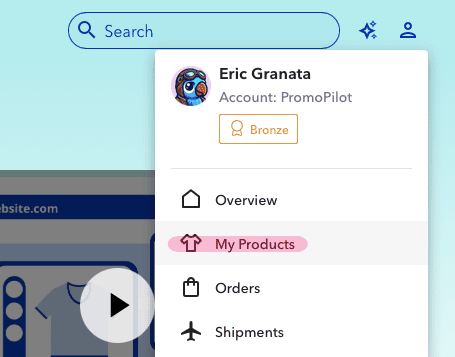
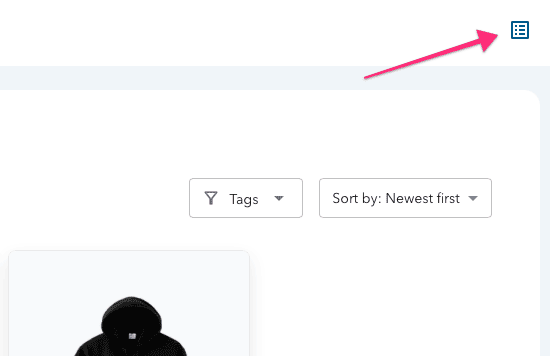
Before we start setting up our product in Liftoff and wiring things together in Order Desk, we need to set up the product in Safsira. If you're following along, now would be the time to sign up for an account at the Safsira website. After setting up your account, click on the main nav icon at the top-right of the page and click on My Products.
Safsira main navigation
Click that little person icon up there.
You'll be taken to a page with the products you've set up in Safsira. If this is a fresh account there won't be any. To add a new product, click the little Catalog icon in the top-right corner of this page.
Safsira catalog button
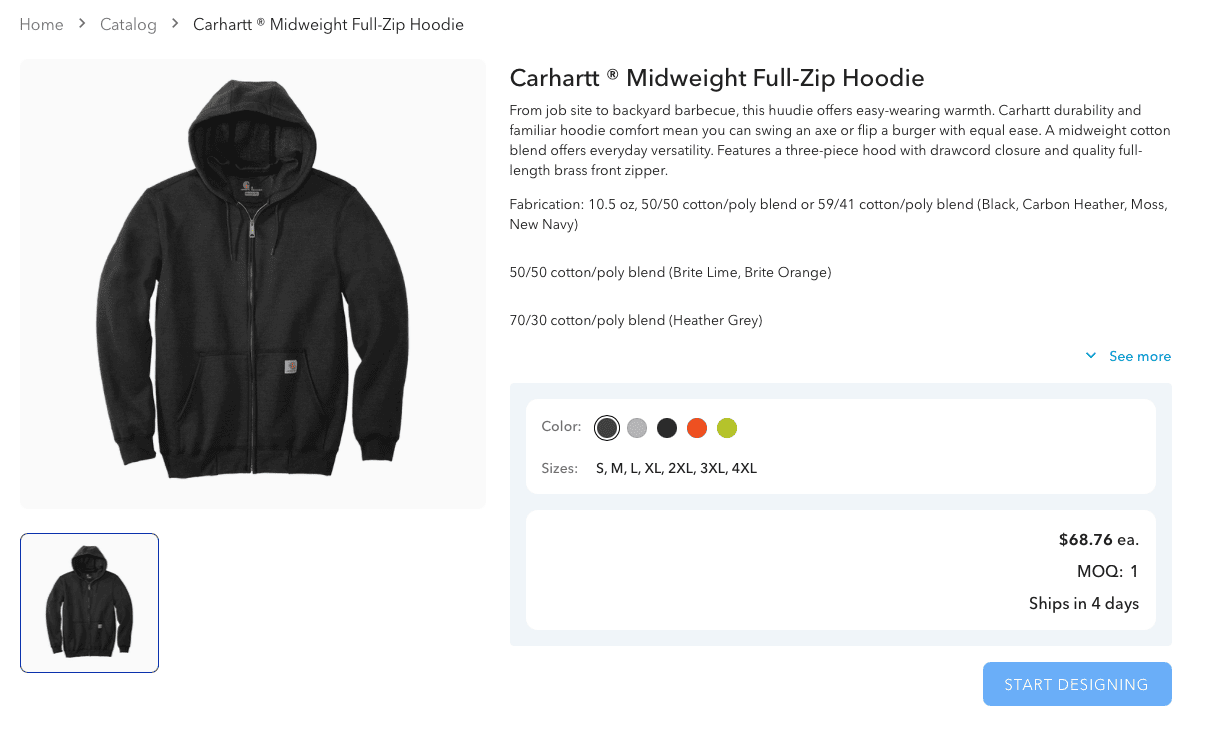
You'll be presented with Safsira's selection of premium merch and apparel. For the purpose of this tutorial, we're going to select a wearable item that comes in multiple color ways and sizes.
Safsira product detail page
Once you've found the product you wish to configure, click the blue Start Designing button to be taken to the product designer.

1. Select Color
The first step in configuring your Safsira product is to select your color. As you click on each color swatch note the color name (it'll be important later). When you select a color, you'll be informed if that color has inventory available and you may notice the available sizes change between colors. This should inform your product selection and configuration in Liftoff. You don't want to configure colors or sizes that are not available.

When you've got the color selected, click on the blue Start Designing button.
2. Upload and Select Artwork
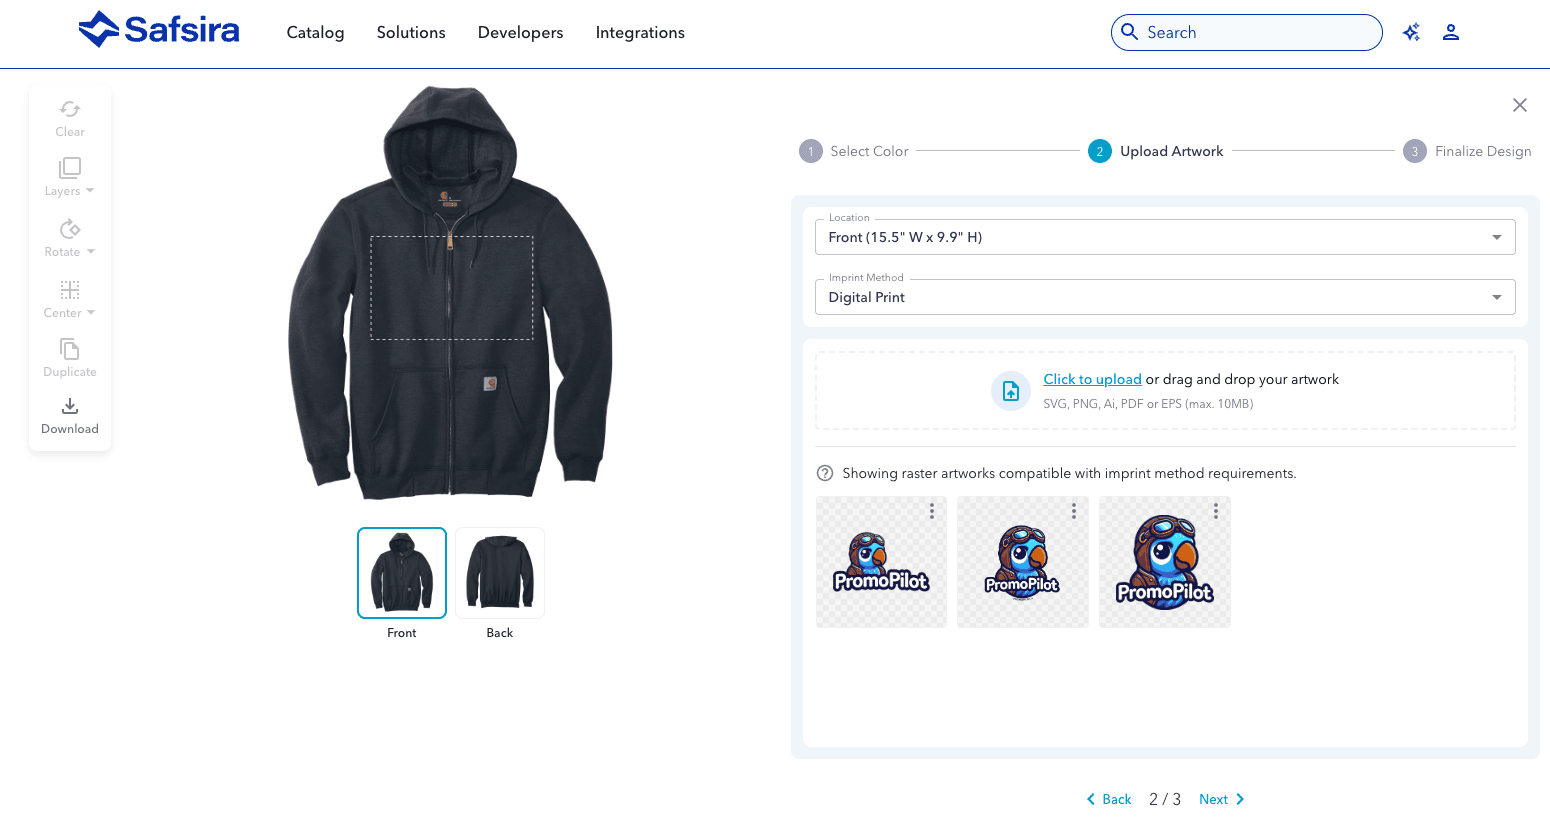
On this screen you will select the imprint location that you want to configure as well as the decoration method. You'll notice that the imprintable area is displayed on the product image to the left.

You'll then need to upload your artwork. In general I recommend that your artwork be created to size. In our example the imprint method is Digital Print and so we'll simply upload a high-resolution PNG. Safsira will show you the artwork that you've uploaded previously, filtered to only show you artwork files that are compatible with your selected imprint method.
Safsira product designer

Once you've selected your artwork, it will appear in the imprint area of the product image. If you've used a product designer before, you'll be familiar with the tools on the left, which you can use to manipulate your placed artwork. When you've got the artwork placed, click the blue Next button.
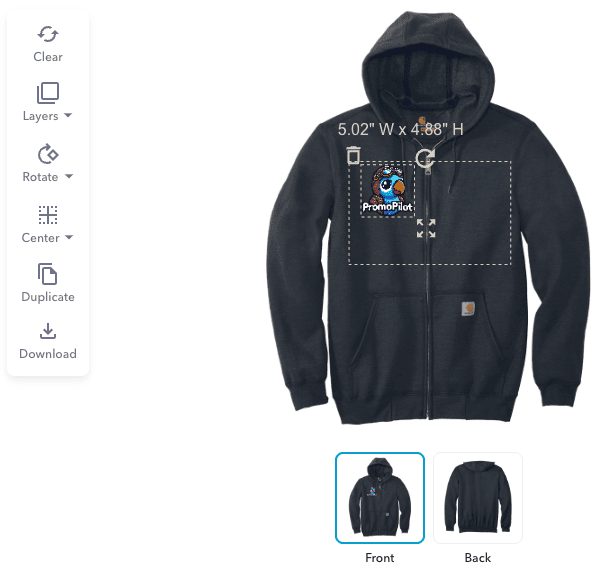
Safsira product designer
These tools help you place the artwork.
3. Finalize Design
On this last screen you can give the product a new name and tags. By tagging products, you'll be able to filter your products on the My Products page as your catalog of configured products grows. Click the blue Finish Design button.

You will be taken to your new product's detail page. Now that your product has been finalized, you will find it listed under My Products.

On this page you need to note a few things before we continue:

Product ID: This ID will be used to set up our product in Liftoff.
Color Name: Mouse over the color swatch to reveal the color name. We'll need to use it exactly as it appears here in Liftoff.
Available Sizes: These are the sizes we'll configure in Liftoff. We must use the same size abbreviations as seen in Safsira.
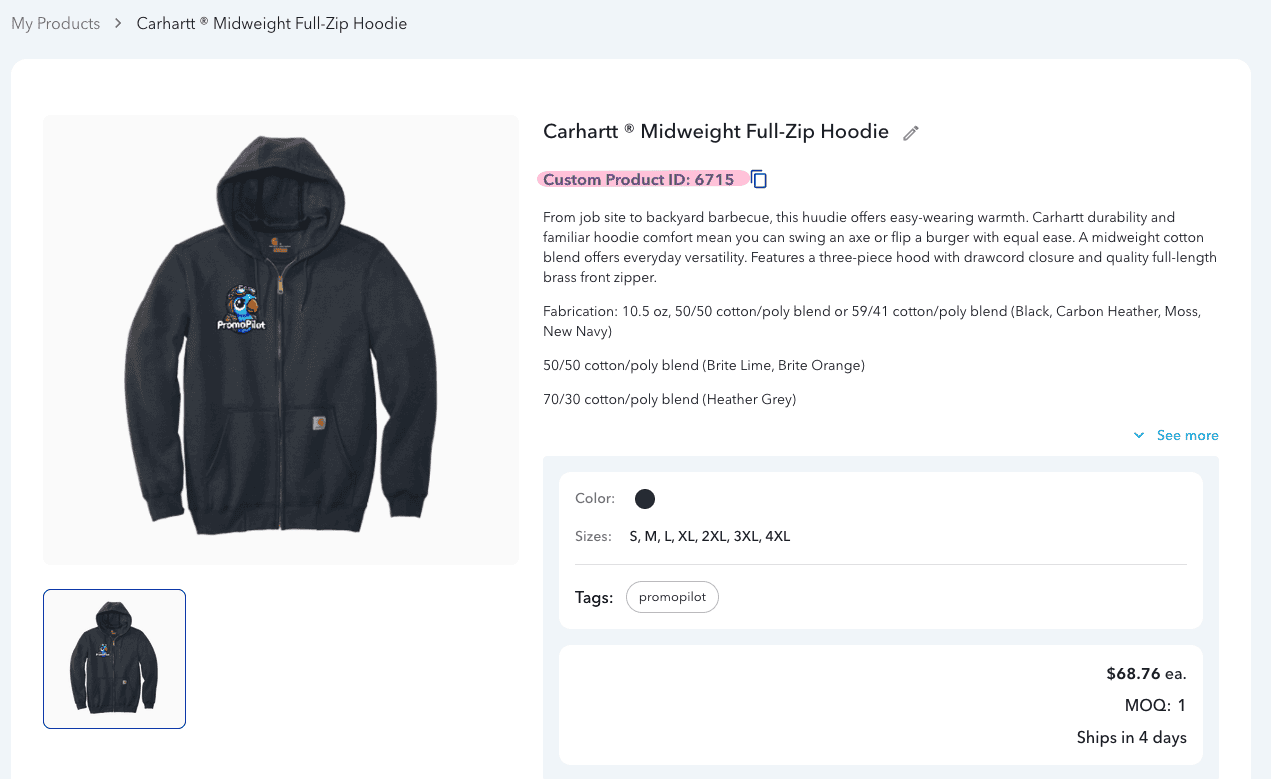
Finished design in Safsira
Note the Custom Product ID, Color, and Sizes.

Set Up in Liftoff

Now we're ready to do some setup in Liftoff. If you're using another e-commerce platform, I still recommend you skim this section, especially when it comes to metadata. Remember, we're going to add some extra information in Liftoff so that we can avoid needing to add it to Order Desk.

Set Up Vendor and Fulfillment Workflow for Safsira
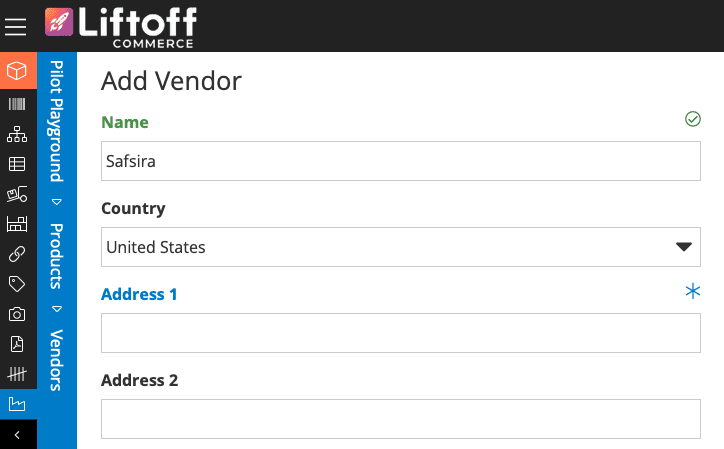
Log into the Liftoff admin interface and navigate to Products > Vendors and add a new vendor. You can name it "Safsira". For more information on vendor creation and settings, refer to Liftoff's documentation on Vendors. You do not need to configure an integration for this new vendor.
Liftoff Add Vendor

Now that the Safsira vendor is created, let's assign them to a Fulfillment Workflow by navigating to Products > Fulfillment Workflows. You can name the workflow "Safsira" and then select your new Safsira vendor as the Default Workflow Vendor.
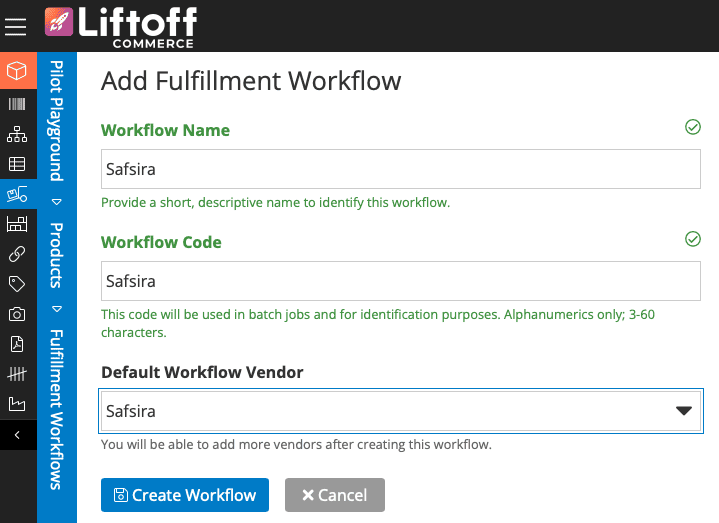
Liftoff add fulfillment workflow
Set Up Product Classification and Custom Product Fields
Product classifications provide a means for establishing different types of products in Liftoff. One benefit that product classifications provide is they can be configured to show custom product fields to store admins for the types of products that need them. Create a new product classification for Safsira products by navigating to Products > Product Classifications.
Next, navigate to Products > Custom Fields and choose your Safsira product classification from the dropdown. Now add a new custom field with "print_sku" as the field name. This is our first bit of metadata for Order Desk. When setting up POD products in Order Desk, the print_sku identifies the product that your POD vendor will be fulfilling.
Adding the custom field in Liftoff
Set Up Your Product
In this demonstration, we're going to set up a wearable for PromoPilot. We'll set this product up like most other products, but we'll point out the important parts for our project below:
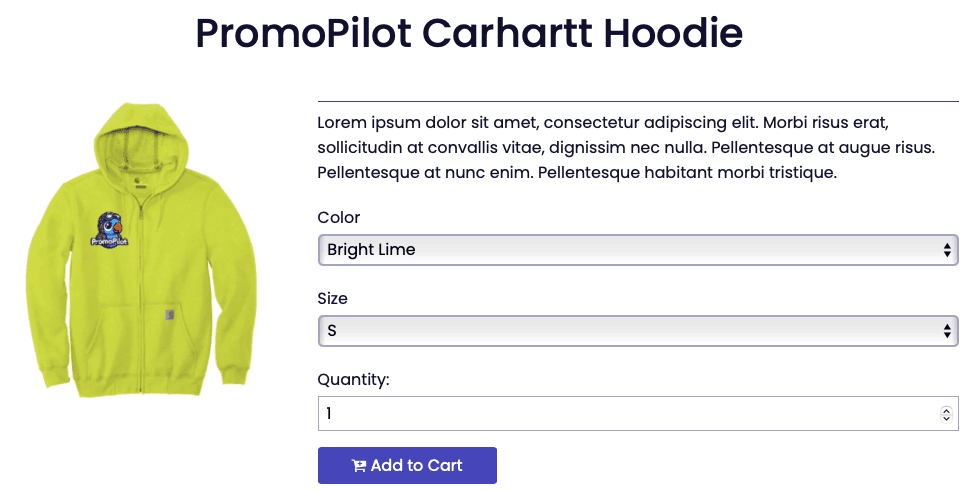
A hoodie on a storefront
Grab the virtual image from Safsira, or make your own.
Product Classification
Set the product classification to the one we set up for Safsira products earlier. This will make it so that when we add our custom field values, the print_sku field will be visible to us.

Fulfillment Workflow
Set the fulfillment workflow for this item to Safsira, the fulfillment workflow that we set up earlier. This is important because, in Order Desk, we'll create a rule based on this product coming from this vendor.

SKU Options
We're setting up a wearable product and so there will be Color and Size SKU options set up in Liftoff. You were probably going to do it anyway but for the purposes of this demo, make sure to set these option names as "Color" and "SKU" and set the values to match the color name and size abbreviations seen in Safsira.
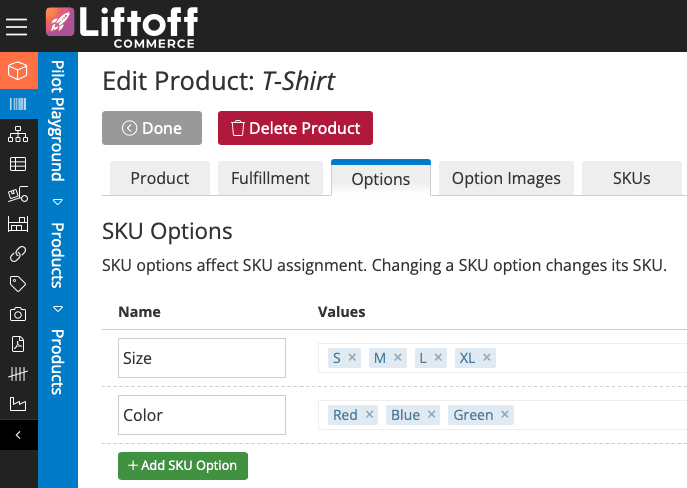
Uploaded file to Liftoff product
Custom Fields
Because we set our product classification for this item to the Safsira classification that we configured earlier, we're now able to enter a Product ID into our print_sku field. Note: Each colorway of the product will have it's own Safsira Product ID and so, in Liftoff, you'll need to set the print_sku of each variant of the product to the matching color's Product ID. For example, all Bright Lime variants will have one product ID and all Navy variants will have another Product ID.
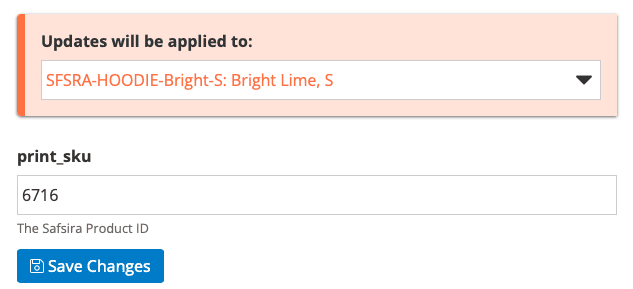
Add custom field values in Liftoff
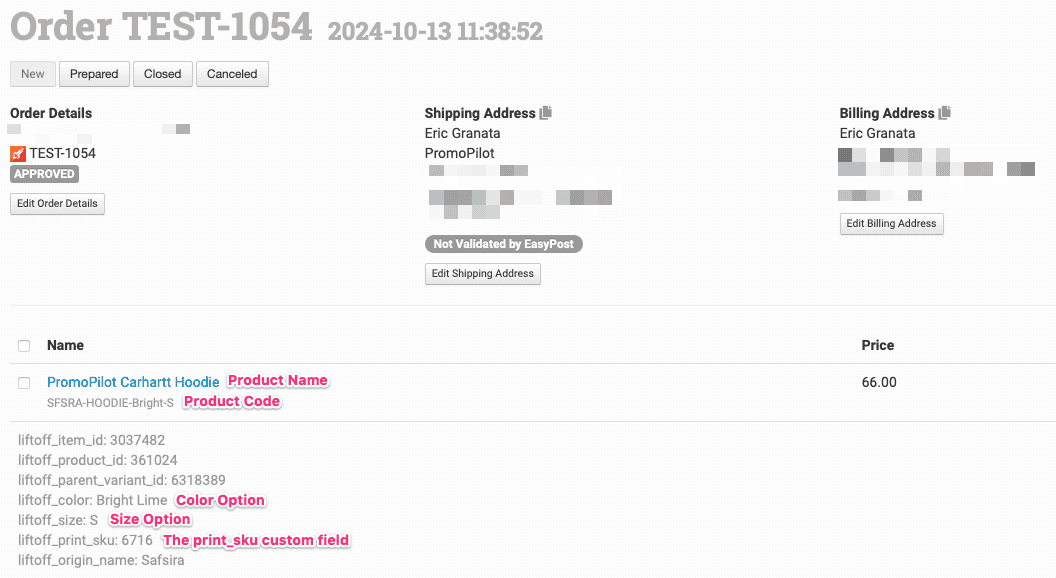
Holy smokes, you guys! We're almost done. If you were to place an order for this item and import it into Order Desk, here's what it would look like.
Imported Liftoff Order in Order Desk
You'll notice in the image above some familiar and important values, including the value for our custom print_sku field, the color, and size of the item. We'll next use this metadata to build our rules so that the next time this item is ordered, Order Desk will automatically send it to Safsira.

Order Desk Core Concepts

If this is your first outing with Order Desk, there is a lot to learn. Thankfully their extensive knowledge base provides plenty of helpful information. Although we won't cover everything in this post, you can sign up for a 30-day free trial (no credit card required) and follow along.

There are a few Order Desk concepts to note before we begin.
Orders go into folders.
In Order Desk, every order is categorized into folders. By default, you'll find folders for New, Prepared, Closed, Canceled, and All orders. Think of folders as digital trays for organizing job jackets.
Rules power the automation.
Rules in Order Desk are crucial for automating order management and fulfillment. They allow you to define actions based on specific events and filters, offering a high level of customization.
Inventory Items are cool but optional.
Order Desk can store your product details as Inventory Items to help automate workflows and sync with fulfillment providers. I try to avoid having to manage product data in more than one location, so we won't use Inventory Items in this integration. But they can be valuable for other print-on-demand projects.
Item metadata is crucial.
Item metadata in Order Desk functions like tags, adding crucial details to your products. In our case this includes the Safsira product ID (in the print_sku field), size, color, and vendor name. Using metadata ensures that all necessary details are included when an order is sent to a fulfillment provider, Safsira in this case.

1. Configure Your Liftoff Integration

To add the Liftoff integration to your Order Desk account, follow these steps: In the left navigation, click on Manage Integrations, search for Liftoff, and click the Enable button.
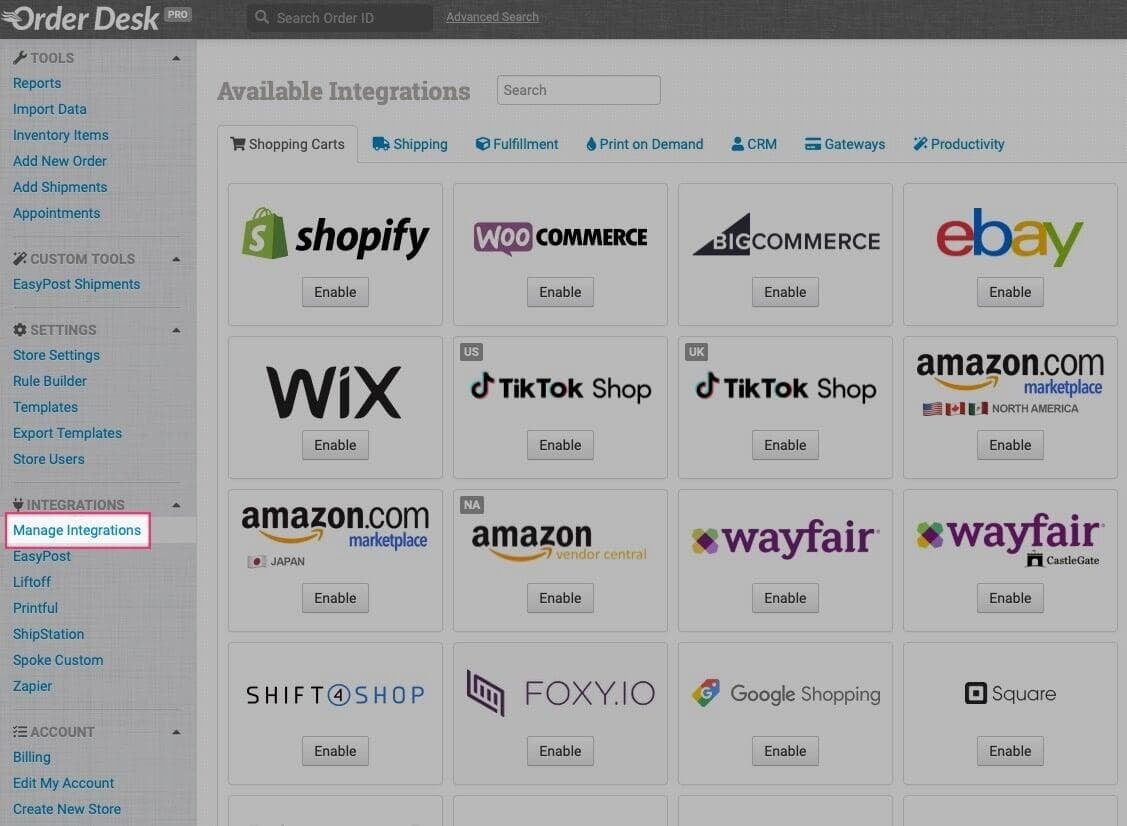
Order Desk Manage Integrations

You'll be asked for your Liftoff Account Code and API Key. Every store in Liftoff has an account code; to find it, in the left navigation click on All Accounts. You can find your admin user's API key by clicking on your name in the top navigation of Liftoff, navigating to your Profile, and then clicking on API settings.
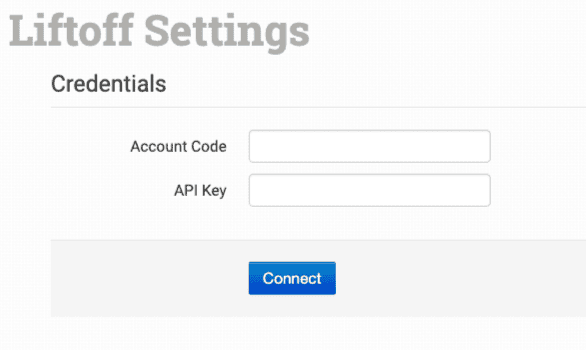
Adding login credentials to Liftoff integration
Once connected, you'll be able to configure some integration settings. Most of these settings are self-explanatory, but we'll call your attention to a few:

Orders to Download
You'll likely want to set this to In Process. That way, orders don't flow into Order Desk until they are actually submitted by the customer.

Sync Tracking Numbers
Enable this if you want tracking numbers from Safsira to automatically be pushed back up to Liftoff, triggering your shipping notification emails to your customers.
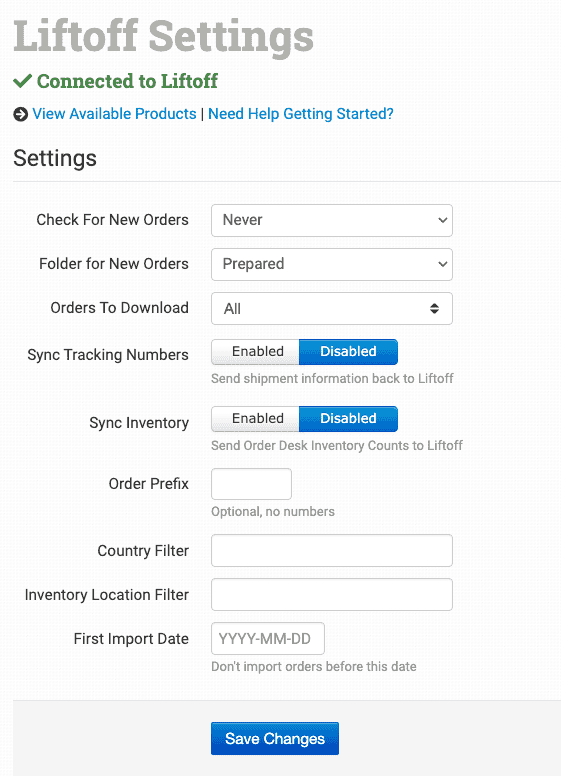
Liftoff integration settings in Order Desk
You'll probably want to only download orders that are In Process. You may also want to sync tracking numbers.
At this point, you can import Liftoff orders if you'd like to see how they will appear in Order Desk. But we'll take a deeper look at this when we set up our Order Desk rules later in this post.

2. Configure Your Safsira Integration

Configuring the Safsira integration in Order Desk could not be easier. In Order Desk, simply navigate to Manage Integrations in the left side navigation bar and search for Safsira.
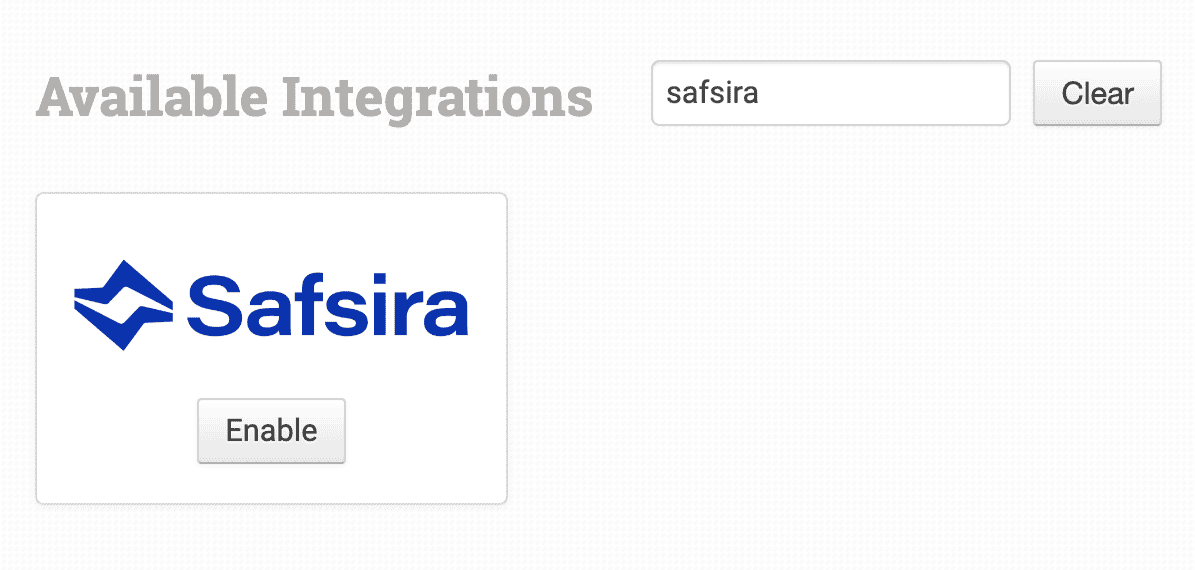
Searching for the Safsira integration
Hooray! You found it!

Next, click on the gray Enable button. When you do, you'll be prompted to connect to your Safsira account. When you do, look out for a pop-up that displays the Safsira login page. Log in with your credentials and you'll be taken to the Safsira integration settings page in Order Desk.

Connect to Safsira
Click the button and log in to Safsira.

The Safsira settings page in Order Desk could not be more simple. One of the cool things about Safsira is that you can set up multiple Accounts within Safsira and you can use this to organize your programs. If you're just getting started, you likely have only one account and it will be selected for you. Similarly, Safsira can support multiple payment methods. These payment methods are invoiced and charged when a new order is placed.


With your Account and Payment Method selected, you can choose which folders you're Order Desk orders will be placed in upon import into Order Desk and upon shipment.


There are additional fields for Product Code Match settings. In most cases, you can leave these blank, but if you're curious about what they do you can read about them here.

The Safsira integration settings
Most likely, you'll leave all of these settings as their defaults.

3. Set Up Order Desk Rules

Order Desk's rules engine allows you to create two types of rules: Item Rules, which act on specific line items, and Order Rules, which act on the entire order. Our first rule needs to set some item metadata so that Safsira knows which of our configured Safsira products to order, in what color, and in what size.

Set Up Item Rule
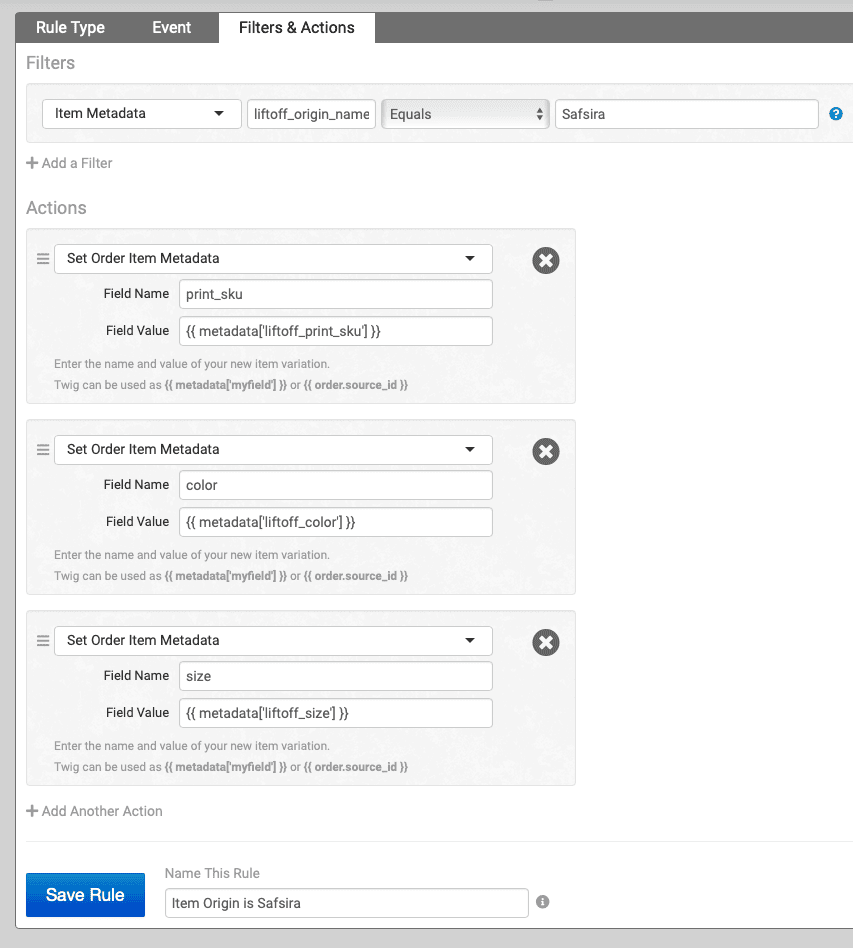
In Order Desk navigate to the Rules Builder and add a new rule. Select Item Rule and choose Order Is Imported as the trigger. Next, we want to add a filter to this rule so that it only triggers when a line item's vendor (also known as origin name), is "Safsira". To do that choose Item Metadata from the dropdown, then enter the metadata's field name, liftoff_origin_name, choose Equals from the next dropdown menu, and finally enter Safsira as the value. The rule will only trigger if the item is identified as coming from Safsira.

Our Item rule now needs three actions – we have the print_sku, color, and size values in the Liftoff metadata. Those field names look like "liftoff_print_sku". Note the "liftoff_" prefix. When we pass here values to Safsira we'll need those values to be passed in fields without the "liftoff_" prefix. This is easily accomplished by using Set Order Item Metadata actions with field names for "print_sku", "color", and "size". To set those values we refer to the existing metadata like so:

{{ metadata['liftoff_print_sku'] }}
and
{{ metadata['liftoff_color'] }}
and
{{ metadata['liftoff_size'] }}

Your completed rule should look like the image below.
Completed rule in Order Desk
It's a breeze from here. Promise. You're doing great! 💪
Set Up Order Rule
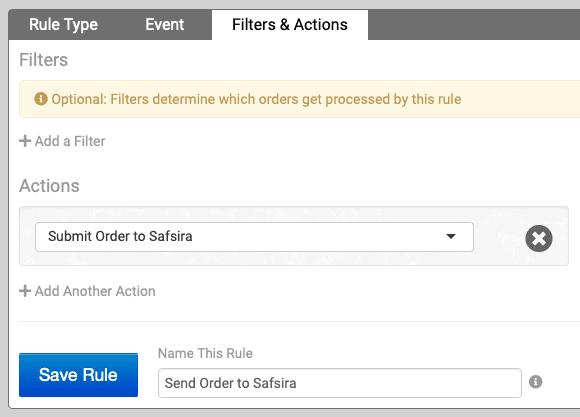
Our final rule will simply send the order for the product to Safsira for production and fulfillment. If you're planning on introducing POD to your own Liftoff program, you would likely want to create a rule to split the order based on the line item's vendor or other factors, which Order Desk is totally capable of. But for this demonstration, we'll simply assume that all orders are for Safsira, and so our rule set puts all the item data in the right place and sends the order on to Safsira. Here's how we do it.

Create a new Order Rule beneath the item rule you just created. Rules are run in the order that they appear in the Rules Builder. Set the order to trigger when the order is imported. For the action, choose Submit Order to Safsira from the dropdown. Give the rule a name and save. Your Order Rule should look like the image below.
Order Desk Rule

Turn your rules on and...

4. Place A Test Order!

Note: At time of writing, there is no way to cancel orders sent to Safsira. The Safsira team has advised that this capability is on its way. In the meantime, you may want to coordinate your test with the Safsira team so that test orders are not put into production.
Run over to Liftoff and order your Safsira item! Then skip over to Order Desk and find your order. It may already appear in the Prepared folder, which, if you kept the default values when configuring your Safsira integration, it is placed into automatically after being sent to Safsira. If it isn't you can either wait for the order to be imported or navigate to the Appointments page (in the left navigation bar) where you can force the import to run.

Once the rules have run, if you navigate to the order details page and expand the item metadata under the Safsira, you will see three new metadata fields, print_sku, color, and size. These are the result of the Item Rule that we set up.
Now scroll down to view the Order History. You should see that the order has been submitted to Safsira. That is the work of the Order Rule that we set up. In a few minutes, if you refresh the page, you will see that Safsira has received the order. 

Conclusion

We hope you've found this tutorial to be helpful and that it has inspired you to check out Order Desk and Safsira for yourself! If you run into any hiccups following these instructions, feel free to reach out.
Eric Granata

Eric Granata

Managing Director PromoPilot, LLC

Eric Granata is the Managing Director of PromoPilot, an automation consultancy firm serving the promotional products and printing industry.